Superlok I-Fitting & Standard Tube Fitting Installation Procedures |
Superlok I-Fitting Installation Procedure |
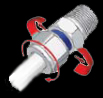
Out of box state. Red pop off ring attached and secondary blue inspection band underdeath |
Insert tube into the fitting until it stops. Hand tighten nut firmly. |
Insert wrench on wrench flats of both nuts. Turn approximately 1-1/4 turns until red ring seperates and pops off. Visually double check gap by blue band. |
|
||

Superlok Standard Tube Fitting Installation Procedure |
1. Installation under 1 inch or 25mm Superlok Tube Fittings shall be delivered to the customer completely assembled and ready for installation. Turning the nut to the finger tight position is the only requirement before starting the installation. Fittings should not be disassembled before installation to maintain cleanliness and prevent unwanted foreign material from entering the system. Care in the proper selection of tubing |
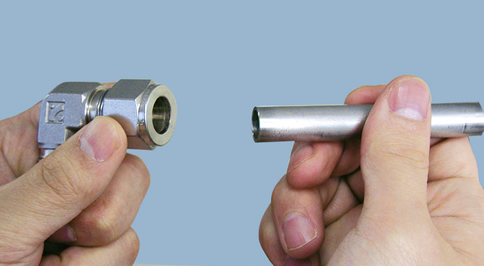
Step 1 Insert the tubing into the Superlok Tube fitting making sure the tubing is bottomed out and is in complete contact with the shoulder of the fitting. Also, the nut should be in the finger-tight position at this time. |
|
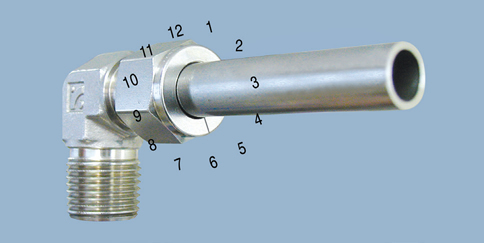
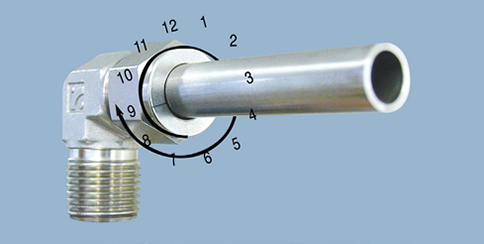
Step 2 Before tightening, mark the Superlok nut at the 6 o’clock position. |
|
|
Step 3 Hold the fitting body safely with a back-up wrench and
tighten the nut 1-1/4 turns until your mark reaches the
9 o’clock position. |
|